Technical Systems – Anchors and Rescue
Anchors
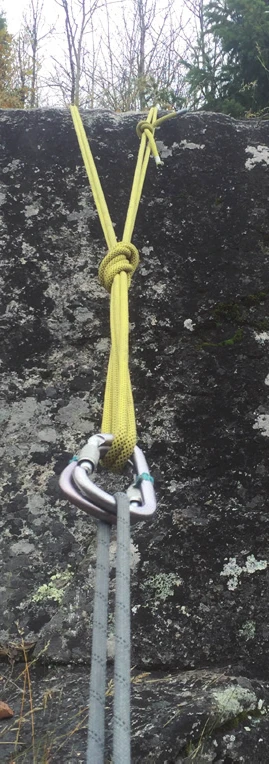
A well constructed top rope anchor is one that is: able to withstand all potential forces; is efficient to construct; requires a minimal amount of equipment; and is positioned in a manner that minimizes the climbing rope abrading over an edge or moving through loose material. In instances where the anchor will be used for top belayed climbing, the anchor should also be positioned to facilitate belaying and potential rescue.
When assessing the integrity of fixed protection bolts the following criteria should be considered; the size of the bolt, the age and quality of the bolt, the quality of the rock the bolt is placed in, the quality of the bolt placement, and any potential multiplication of force that could be exerted on the bolt once it is loaded.
Anchor Criteria
The overall quality of a constructed anchor can be assessed by ensuring it meets all of the criteria listed below.
Integrity
Integrity refers to the overall strength of the material and anchor points used throughout the anchor configuration. Whenever possible, all components of the anchor configuration should have a minimal strength rating of 22Kn. When building large anchors from natural protection such as trees and boulders, where the integrity is unknown, caution should be used to ensure that these anchor points will unquestionably hold all anticipated loads.
Doubled
Doubled refers to ensuring there is redundancy throughout the anchor configuration. This means there should be a minimum of two anchor points, and that the master point of the anchor is comprised of a minimum of two strands of anchor material. In instances where the anchor will not be directly monitored, the critical connection between the climbing rope and the anchor must be comprised of two locking carabiners.
Equalized
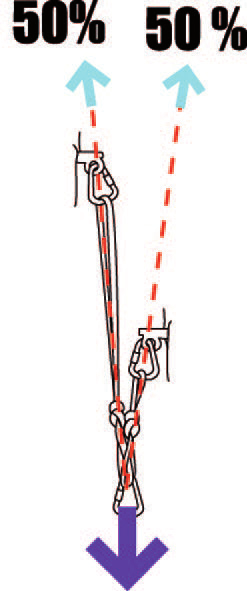
Equalized refers to the load being evenly distributed to each anchor point. This can be achieved by ensuring that the master point evenly bisects the angle created by the anchor arms.
Due to the many variables that affect load distribution on an anchor, it is nearly impossible to attain true equalization. A top rope leader should strive towards distributing the anticipated load as evenly as possible on each anchor point, recognizing that true equalization may not be achieved.
Angle
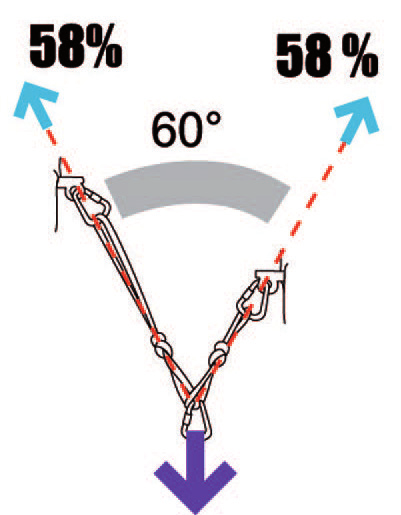
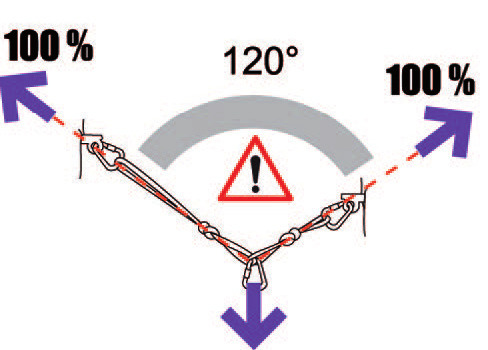
In order to minimize the multiplication of force on the anchor points, the angle between the anchor arms should be kept between 20 and 60 degrees when practical. At no point should the angle exceed 90 degrees.
Limited Extension
Any potential extension, and subsequent shock loading of the anchor that could occur due to the failure of an anchor point, needs to be limited. In the case of a unidirectional anchor this can be achieved by creating a master point. Whereas in a multi-directional anchor configuration, extension limiting knots must be used.
Sharp Edges
Any sharp edges in contact with an anchor should be addressed. This can be done by ensuring that no moving components within an anchor are laying or abrading against or over a sharp edge.
Anchor Configurations
Anchors can be constructed in one of two manners, either in a unidirectional configuration that is designed to take force in a single direction only, or in a multi-directional configuration that is designed to adjust itself to a moving load. In the top rope climbing context, all large anchors or anchors that incorporate natural protection such as trees and boulders, should be configured in a unidirectional manner. Small anchors connected to bolts can be constructed as multi-directional anchors when practical.
Unidirectional Anchors
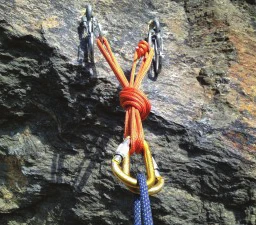
Unidirectional anchors are created by connecting full strength anchor material such as a static rope, sling(s), or one-inch tubular webbing, to two independent anchor points. The material can then be aligned with the anticipated direction of loading and a master point created by tying a figure eight on a bight. Static rope and one-inch tubular webbing may need to be folded back on itself prior to tying the figure eight on a bight to create redundancy at the master point. If this is the case, the closed tail should also then be passed over the master point to capture it.
If constructing a unidirectional anchor from bolts, the anchor material can be connected to the hangers with non-locking carabiners. If building a large unidirectional anchor from trees or boulders, the anchor material can be tied directly to the anchor point, or the anchor point can be initially slung and the anchor material then connected to the sling or slings with non-locking carabiners. In instances where the non-locking carabiner(s) connecting the anchor material to the anchor point is contacting rock, the ground, or any other object, a locking carabiner should be used in lieu.
Multi-Directional Anchors
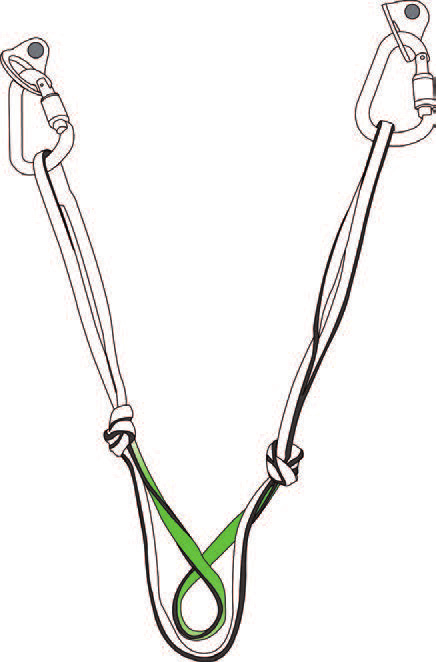
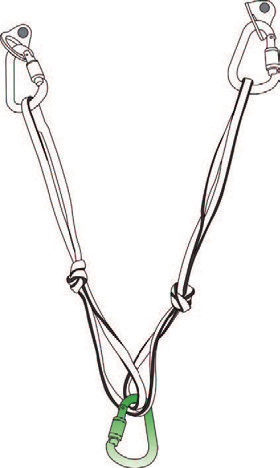
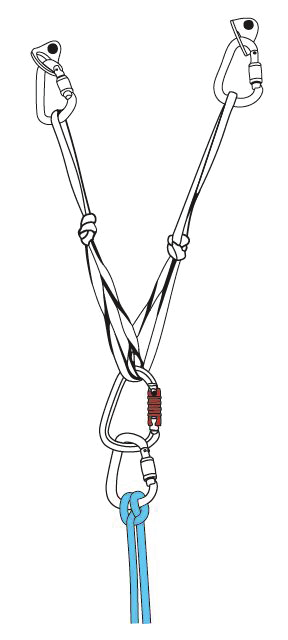
In instances where an anchor is being built from bolted anchor points, a multi-directional configuration can be used. To construct a multi-directional anchor, a sewn sling can be connected to the hangers with non-locking carabiners, and a single twist placed in one strand of the sling creating a loop. Two locking carabiners are then passed through the loop and the other strand of the sling to create the anchors' master point. To create redundancy and limit extension, overhand knots need to be tied into each of the anchor arms in such a manner that the anchors' self-adjusting properties are not restricted.
Anchor Extensions
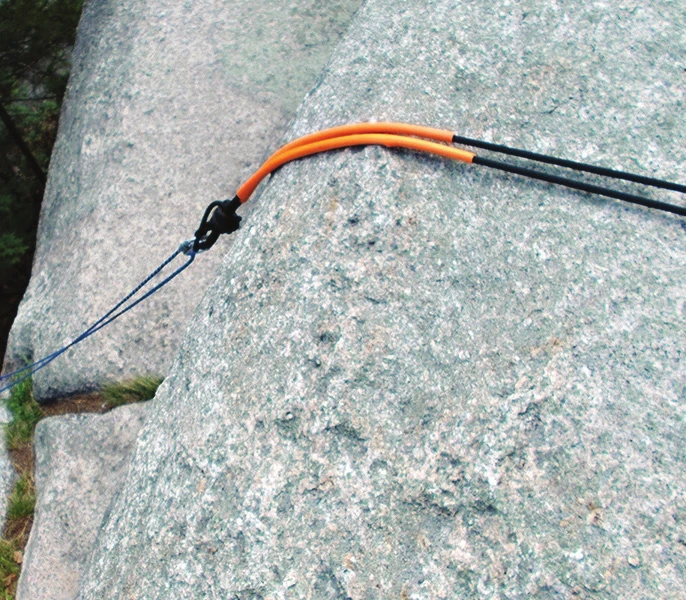
In instances where it is not practical or possible to safely create a master point on a unidirectional anchor where desired, an anchor extension enables the initial master point to be created and then extended from. Anchor extensions must meet the same anchor quality criteria as the initial anchor. They are most often completed by basket hitching a sewn sling, a tied loop of one-inch tubular webbing, or a section of static rope through the master point of the initial anchor, and then tying a new master point in the extension.
Tethering to Anchors
In situations where the top rope leader will be belaying from above, constructing an anchor from a position with a significant fall potential, or the top rope leader is threading an anchor in preparation for rappel, the leader should be tethered to the anchor to prevent them from falling. This can be achieved by using the climbing rope if belaying from above, or by using a sling or dynamic tether if constructing an anchor or preparing to complete a rappel.
Tethering With the Climbing Rope
Tethering to an anchor with the climbing rope enables the top rope leader to efficiently adjust the length of the tether. This is desirable in situations where top belaying techniques are being applied, as it allows the leader to position themselves in a manner where they can see the climber. To tether to the anchor using the climbing rope, the top rope leader needs to be tied into the climbing rope with a figure eight follow through knot, and the rope then connected to the anchor with a clove hitch on a locking carabiner.
Tethering With a Sling
When threading an anchor to rappel, tethering to the anchor can be completed using a sling. For this configuration a sling should be girth hitched through the top rope leaders' tie-in points, and a locking carabiner used to connect the sling to the master point of the anchor.
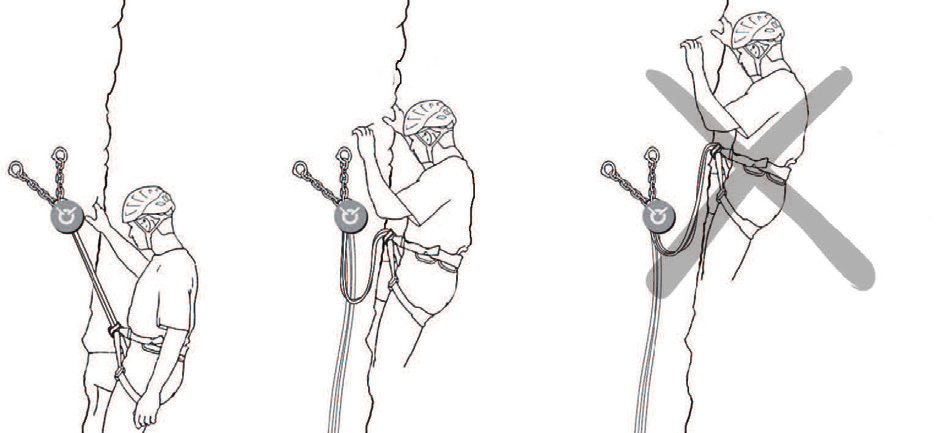
Due to the low elongation properties of sling material, whenever tethering to an anchor with a sling it is important to keep the sling tensioned at all times. Even a short fall directly onto a sling can create significant impact forces that can cause injury. In situations where potential for a fall onto a tether exists, it may be preferable to use a commercially manufactured dynamic tether or a Purcell Prussik.
Threading an Anchor
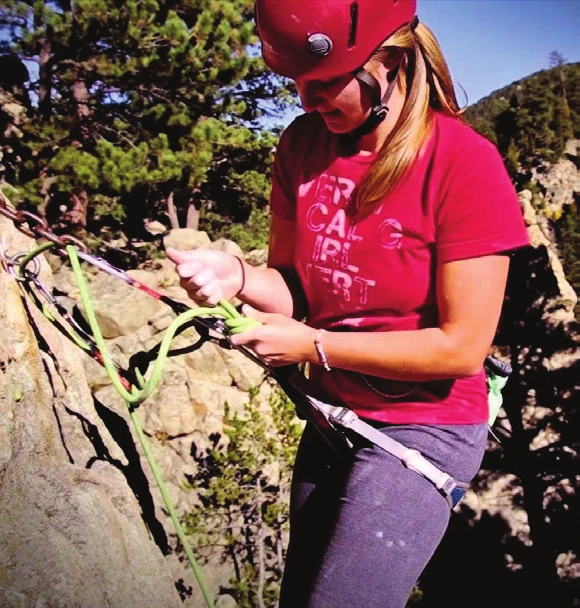
When threading an anchor to either lower or rappel from the permanently fixed hardware, a series of load transfers is required. The initial transfer should be from the belay system to the anchor and is often achieved by using a tether to connect the climber to the anchor with a locking carabiner. Once secured to the anchor the climber can facilitate threading the rope through the permanent hardware while ensuring the rope is continuously connected to themselves so that it can't be dropped. Following the threading of the anchor the climber can then either re-tie into the rope or set up to rappel. A thorough check of their system must be completed. Lastly, the climber can then transfer themselves back on to the belay system or on to the rappel system and complete their descent.
Directionals
The use of directional quick draws in a top rope climbing context is often over looked. However, well placed directionals on top rope routes can increase safety and facilitate participant success. In instances where the route being top roped has existing fixed protection bolts, directional quick draws can be used for the following purposes:
- To keep the rope aligned with the route if the anchor is not positioned directly above the line of ascent;
- To keep the top rope or the climber away from loose rock;
- To create a point of aid to assist the climber past a challenging section of the route;
- To create two separate climbing lines from a single top rope anchor;
- To create an alternate success point or end to the climb in instances where it is preferable for the climber not to climb all the way to the anchor; and/or
- To prevent a pendulum swing or fall on routes that traverse or have overhangs.
Improvised Rescue
Through the diligent management of risk, and careful assessment of participant competency, the need for rescue can often be avoided or prevented. That said, when dealing with the natural environment occasionally factors outside of ones' control may lead to accidents. In the top rope climbing context, improvised rescue can be relatively straight forward if the injured participant is being belayed from below, or can be relatively complex if the participant is being belayed from above.
Basic Rescue From Below
If a participant is injured while being belayed from below on a top rope climb, rescue is relatively straight forward. Assuming no additional hazards are on the ground, they can immediately be lowered and first aid can be administered.
Complex Rescue From Above
Rescuing an injured participant from above is a complex skill that requires advanced knowledge and ongoing practice to complete effectively. Whenever possible, situations that could require a participant to be rescued from above should be avoided. If a rescue from above is needed, the top rope leader will need to complete some or all of the following steps depending on the severity of the injuries:
- Tie off an Italian hitch;
- Descend a fixed rope to the injured participant via rappel and perform first aid;
- Construct an improvised chest harness;
- Ascend a fixed rope; and/or
- Create a raising system.
The nature of some top rope climbing venues is such that accessing anchors and belaying from above may be the only means of completing the day's activities. If these sites are being utilized for an outing, it is imperative that the top rope leader recognize and mitigate the potential fall hazard that top access presents and be adequately prepared to complete a complex rescue from above in the event of an emergency.
Tying Off an Italian Hitch
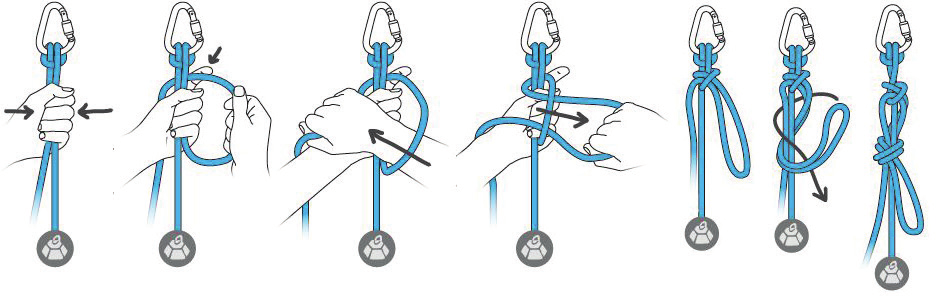
Tying off an Italian hitch is typically the first step in completing a rescue from above as it secures the injured participant and enables the top rope leader to then carry out other components of the rescue. It is always desirable for a tie-off to be releasable under load, the preferred method for tying off the Italian hitch is to tie an overhand slip knot around the loaded rope with the brake rope and then secure the tail of the slip knot by tying the bight around both the load and brake strands of the rope with an overhand knot.
Improvised Chest Harness
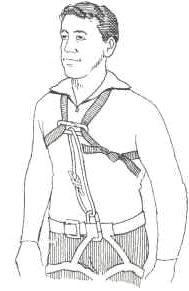
In instances where injuries or level of consciousness prohibit the injured individual from maintaining a seated position in their harness, an improvised chest harness should be used to prevent them from inverting. An improvised chest harness can be created using a 120 centimetre sewn sling by putting one twist in the sling and passing the injured individuals arms through the two loops created, so that the twist crosses their back. The front of the improvised chest harness can then be connected to the climbing rope the injured individual is tied to, using a short prusik, to keep them in an up-right seated position.
Rope Ascending
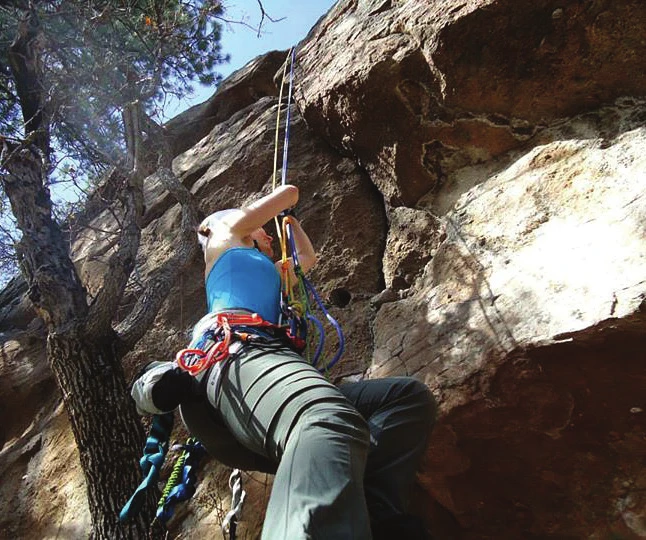
If it has been deemed necessary to descend a fixed line to the injured participant in order to perform first aid prior to completing any other improvised rescue actions, the top rope leader will be required to ascend the fixed rope back to the belay at the top of the cliff.
Two 5 metre sections of 7 millimetre cord are required to ascend a fixed rope. The process involves creating two three-wrap prusiks around the fixed rope and setting the upper prusik at roughly wrist height when an arm is extended above the head. The second prusik should be set directly beneath the first with the top prusik then being connected to the tie-in points of the harness with an overhand knot. An overhand knot should be created in the tails of the lower prusik 10 centimetres below the prusik as well as roughly 6 inches below foot height with a bent knee. The tail end of the sling which has been used to extend the belay device to complete the rappel on the fixed line, should then be connected to the small closed loop below the lower prusik with a locking carabiner. The top rope leaders' weight can then be transferred from the belay device to the prusiks' enabling the belay device to be removed and an ascent of the fixed rope to be completed.
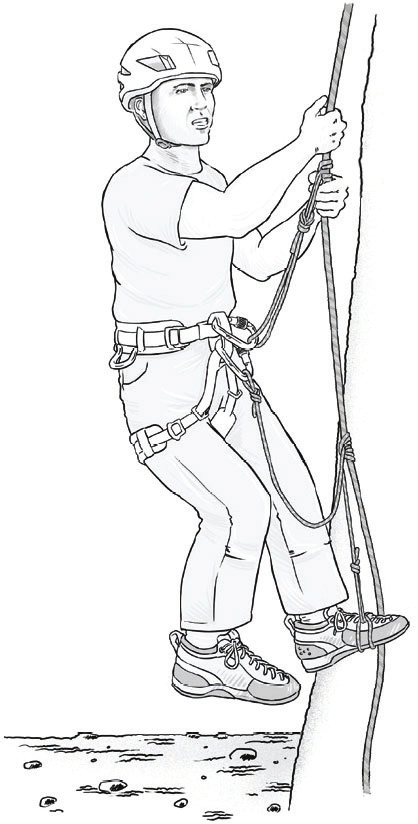
An improvised etrier for ascending, can be created by girth hitching the lower prusik cord around one's foot.
When ascending an unloaded rope, figure eight on a bight back up knots should be tied in the rope at roughly 3 metre intervals.
Raising Systems
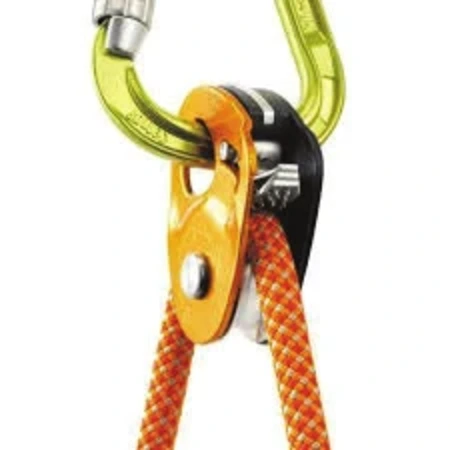
If all other options have been exhausted and it is deemed necessary to raise the injured participant to the top of the cliff, then a 3:1 raising system can be used. To complete a raise, the top rope climbing leader will require additional specialized equipment in the form of a rope-grabbing pulley such as a micro traxion. One procedure for constructing a raising system is as follows:
- Create a three wrap prusik around the loaded rope carrying the injured individual with a 5 metre section of 7 millimetre cord.
- Immediately behind the prusik tie an overhand knot in the tails of the cord to create a small closed loop.
- Connect the tail ends of the cord with a double fisherman's knot creating a closed loop that can then be connected to the anchor with a locking carabiner.
- In the brake strand behind the tied off Italian hitch, add a rope grabbing pulley and connect it to the anchor with a locking carabiner.
- Set the prusik as far down the loaded rope as possible.
- Release the tied-off Italian hitch and lower the load of the injured participant onto the prusik.
- Remove the Italian hitch and all slack between the loaded prusik and the rope grabbing pulley by pulling the rope through the pulley.
- Place a carabiner in the small closed loop directly behind the prusik and redirect the brake strand of the climbing rope through that carabiner.
- Pull firmly on the brake strand ensuring that as the raise is completed rope is moving smoothly through the rope grabbing pulley.
- When the prusik reaches the pulley, reset the system by extending the prusik down the loaded rope as far as possible.
Minimizing friction in a raising system will greatly increase its efficiency. If a sharp edge exists between the anchor and the injured participant, padding it with a pack or other similar material to round it, may make the task less laborious.
The assistance of additional participants in completing the physical component of the raise will make the task significantly less challenging for the top rope leader. However, if significant resistance is met while completing the raise it is important to confirm that the injured participant is not unduly stuck under an overhang or other obstruction.